Free CAD Software for Windows 10

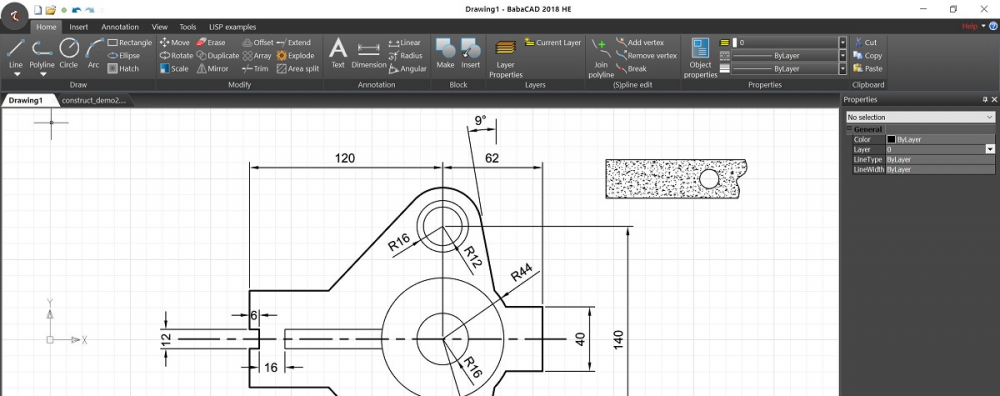
BabaCAD 2017 is released on April 2th 2017. More advanced version of professional free CAD software which is now 64-bit with multi-document-interface with ribbon bar and optimized for Windows 10, but also works for other 64-bit Windows OS like Windows XP, Windows Vista, Windows 7, Windows 8 and Windows 8.1.

Improvements and features that are added in this version are:

* 64-bit version with MDI (multiple-document-interface)
* modern designed with ribbon bar and large buttons
* different line types loads from bcad.lin
* user can update bcad.lin with custom linetypes
* auto-save with recovery (default 5 min)
* type AUTOSAVEINTERVAL in command window to change
* dynamic input (can be turned off – statusbar)
* easy start commands with auto-complete input
* type line/polyline length/angle using DynInput
* grid lines (F7 or status bar to turn on/off)
* anti-aliased smooth rendering (LW)
* new objects like SPLINE, 3D POLYLINE, ELLIPSE…
* join polylines, break polyline, break spline
* new modify tools: array, mirror
* copy objects and blocks between multiple documents
* LISP enabled, use APPLOAD or update bcad.mnu to load lisps
* 3D ready version (3D Modeling coming soon) with 3D objects
* LINE, 3D POLYLINE, POINT are 3D objects in BabaCAD 2017
* update Z coordinate in Properties window
* use 3DORBIT or VIEW to navigate in 3D or projection planes
* image (raster) save is working now (saved with path ref.)

BabaCAD 2017  has everything that every professional CAD software must have. That means you can draw lines, polylines, points, point clouds, circle, ellipse, spline, hatch, block. You can insert annotations or dimensions using smart dimensioning, insert text, images and even georeferenced raster images (tif, geotiff).

Hatch and line types can be customized by editing bcad.pat and bcad.lin files or you can replace them with already prepared files from other CAD platform, as these are standard formatted files for hatch patterns and line types.

Dynamic input allows you to directly type length and angle when drawing line segments, and auto-complete helps you to type commands quickly with just typing command starting letters.

BabaCAD is compatible with AutoCAD and other commercial CAD software cause it’s native file format is DXF and it opens DWG also (dwg version < R2007).

Users can make and insert blocks using block explorer window, then there is capability of organize objects in layers, change colors, line types…

BabaCAD 2017 has LISP interpreter included, so users can load .lsp (AutoLISP) scripts to run user defined commands and functions. There are some LISP examples included for beginners to see how it’s easy to automate some drafting tasks very easy using LISP programming.

Users can develop their own functions using BabaCAD API for .bem (BabaCAD extension modules). BabaCAD API is included in installation (header and lib files can be found in API folder under the installation folder).
BabaCAD – CAD Software for Mac OS X

Apple Mac version of BabaCAD is released on Mac App Store on Dec-21. It’s professional CAD (computer-aided-design) developed as native 64-bit Mac OS X application. Multiple drawings interface, DXF file format (dwg will be available later in version update). Draw line, polyline (with bulge segments), arc, ellipse, circle, hatch with number of patterns included. Make and insert block, insert and save images of popular image formats as png, jpg, gif, tif. Export drawing to image or pdf document. Plot from layouts with multiple viewports available.

BabaCAD for Mac version has a LISP scripting enabled. Just run APPLOAD command (or find in menu) and load your favourite lisp (.lsp) program. Then just type lisp function name to start using lisp function.

To plot in scale, click “Page setup” in File menu, then choose “BabaCAD” from “Settings” list box. Plot setup dialog will appear where you can choose plot units (mm or inch) and specify plot scale.

Object tracking and snap is enabled by default. Move cursor pointer across end-points or specific object to see snap markers (end-point, nearest , intersection, perpendicular) and tracking lines (horizontal ,vertical, extension….).

You can also insert images into your drawing. Click on image insert icon and choose image from dialog. Then, specify insert point and scale factor to insert image in the drawing. Images will be saved among all other geometry objects and blocks.

As every professional CAD application, BabaCAD for Mac comes with support for inserting text, block, hatch, formatting layers, dimensioning (linear, aligned, angular, radius, diameter), modify tools including trim, extend, array, mirror, duplicate, block explode etc.

BabaCAD for Mac page link: http://www.babacad.com/mac

Lesson for CAD beginners

In this article, I’m going to teach you about  how to use basic BabaCAD drawing features.
To delete BabaCAD text objects, use right to left selection mode, and then choose delete from right mouse click menu.

Ok, let me explain how to draw a line object.

To start drawing a line object, just click on line icon on the left toolbar, or type line, in the command window at the bottom. Click with left mouse button in work space to insert first point of the line. Next, specify second point and press Escape key or click with right mouse button to finish the line. To finish any command, you can press escape key or click right mouse button and choose an option from menu window. I prefer to press escape key to finish a command.

Move pointer around the line and click with left mouse button to select the line object. You can select object using left to right and right to left smart selection methods also.
If you click left mouse button and move mouse to the right and click again, all objects inside the rectangular selection area would be selected.

If object is selected, it’s grip points would be shown. For a line object, we have a two end points, and one middle point. We can move pointer close to grip point, and we will notice how it will snap to exact point location. Look down to the left corner of application window, and you will see precise coordinates of snapped grip point.

How to draw other primitive objects, like circle and arc?

Click on circle icon in the drawing toolbar to draw a circle. You will be prompted to specify the center of circle object. We can enter the precise coordinates in the command window, or we can just specify point by clicking in work space. For example, we can enter the 18.25 for x, and 11.2 for Y coordinate. You must press enter on the end to finish the input. Now, we need to specify the circle radius. I will enter the value of 10.

Move around circle and click with left mouse button to select the circle object.
You can see the grip points of our circle object. We have a four quadrant points and one center grip point of the circle.

If you want to modify the radius of the circle, click on any quadrant point and move pointer to adjust the radius. Also, we can modify any object’s parameters in the property window, which is located at the left.

We can also move any object by using a command move, or for some objects we can just click on specific grip point and move the object to another location.
For circle object, click on center grip point and move the circle to a new location.
If we want to move it to exact coordinates of a new location, we can change the center property in the properties window, or we can use a command move.
Click on move icon in the modify toolbar on the right. Next, select the object that you want to move, and type exact coordinates to move object to.

To deselect objects, press escape key on keyboard, or click right mouse button and choose deselect.

To move workspace around, press and hold scroll mouse button, and move mouse around. This is also called a pan command.
If you have mouse with just two buttons, then you can click on pan icon on the top to pan around.

To zoom in and out, just use your scroll wheel, moving up and down. For two buttons mouse, use zoom commands from zoom toolbar or type zoom or just z in the command window.

To get all drawing objects on your workspace, use command zoom extent. Click on zoom extent icon, or choose from right click menu.

Let’s draw an arc object. Click on arc icon in the drawing toolbar or type arc in the command window.

Look at the command window. We are prompted to specify start point of the arc or we have option to specify center of the arc. We can see options closed in brackets.
I will choose to draw from start point, so I’m going to specify start point. Next, we have to specify second point of the arc. To finish, I will specify the end point of the arc.

We can select and modify the arc object as any other object. Click to select, then pick a grip point and move to change a shape of arc object.

BabaCAD as a new target for developers

There is a new section at BabaCAD homepage, Developers section: http://www.babacad.com/developers

You can visit Developers section to learn how to write your own extension modules for BabaCAD (.bem). It’s very easy to share .bem modules between users, as .bem files just have to be copied to BabaCAD/ExtensionModules folder (BabaCAD install folder is in \Program Files\BabaCAD directory). BabaCAD application will automatically load all .bem modules from this folder at the start time.

LISP module, which is the first developed .bem module for BabaCAD, shows many features programmed to extend functionality of BabaCAD software. Microsoft Visual Studio 2010 is only requirement to start programming applications for BabaCAD. BabaCAD v1.3 installs include headers and lib files of BabaCAD Extension API. It can be found in \Program Files\BabaCAD\BabaCAD\API directory.

Read Developers section and you will find example of SLOPE command inside Civil Tools extension for BabaCAD. Full visual studio c++ project (.sln) is there (in zip file). I recommend everyone to use this as a template for theirs new .bem projects. There is necessary entrypoint function of extension API and also some other API functions (for example AddCommand function adds new command to BabaCAD runtime).

I will try to add more examples. Also, I will add a new topic at BabaCAD forum for developers to ask questions and submit comments.


Update your CAD after Windows XP end of support date (April 8th)

Maybe some of you didn’t realize important fact that older versions of the most used AutoCAD drafting software like AutoCAD 2000, 2002, 2004, 2006 can’t run on Windows 7 nor Windows 8. Companies with large CAD seats would have large expenses to update their CAD software to newer versions after Windows XP end of support on April 8th. You don’t have to buy newer versions of CAD software, like AutoCAD 2014 or verticals (Autodesk Map, Civil 3D…) to migrate to  Windows 7 or Windows 8. BabaCAD is one of the best alternatives to AutoCAD LT as it’s free, supports LISP routines, fast download and run (less than 3 Mb installation). You can download BabaCAD 1.3 free and there is also good support on BabaCAD official website http://www.babacad.com . There is also 3D and online web versions in development phase, so check for updates and stay tuned.

You can find video tutorials about BabaCAD at http://www.babacad.com/tutorials.html or you can visit online help pages at http://www.babacad.com/Help/BabaCAD_Help.htm

BabaCADW – Web Online CAD Project Started

BabaCADW is a project of porting one of the best freeware CAD to online web application. It’s in developing phase and I hope that Mac and Linux users will enjoy it just like windows users did. You can watch the progress of development phase every day online at http://www.babacad.com/babacadw and you can also donate to support project by filling contact form. BabaCADW is programmed in Java and there are some settings which has to be maintained in order to run BabaCADW as Java applet in web browser. In windows, go to “Control Panel” and find Java icon. Open it and go to Security tab. There you will see Exception Site list. Click “Edit list” and add http://www.babacad.com and http://jogamp.org. After doing this, there will be no problem to start BabaCADW in any web browser. I recommend to use Firefox, especially for Mac OS X users. Safari on Mac has some bugs with Java applets and mouse wheel functionality, so you can not use zoom with middle mouse button. Windows and Linux users should not have a problem with any web browser (IE, Google Chrome, Firefox….). Till today, only LINE command is implemented to test command-line and rendering functions. All other commands will be implemented later, cause it’s most important to finish app logic and then other functions will be implemented faster.

LISP Enabled CAD — And So What?

First ask yourself why other commercial CAD software like AutoCAD, DraftSight and others, have no customization capabilities for free. LISP (AutoLISP in AutoCAD) is one of the most powerful customization features found in AutoCAD. But only one problem is that AutoLISP is not available in AutoCAD LT (lite low-price version of full AutoCAD). Every neighbourhood has a LISP programmer cause LISP is one of the oldest programming languages and it’s very easy to learn. Even non-programmer can learn to write LISP routines to automate and speed up his CAD work. If you don’t know how to write lisp function then you can find millions of lisp routines on internet for free.

BabaCAD was among the first to have LISP programming support. It’s also AutoCAD AutoLISP compatible in most cases. LISP is available as AddOn/Extension module and you can download latest updated version on http://www.babacad.com/bem

I found that I’ve forgot to include option of changing layer for multiple selected objects in last BabaCAD release 1.3. I will fix this in next BabaCAD release, but I will give here temporaray solution using LISP. Just copy this lisp function to chlayer.lsp (open notepad and copy/paste and save as CHLAYER.LSP). You can set lsp file to automatically load on startup or manually load using command APPLOAD. You can even assign your custom icon and toolbar to your LISP command by editing bcad.mnu file in BabaCAD/Support folder.

(defun c:chlayer (/ lyr ss en ind)
 (setq lyr (getstring “Type existing layer name to change to: “))
 (setq ss (ssget))
 (setq ind 0)
 (while (setq en (entget (ssname ss ind)))
  (setq en (subst (cons 8 lyr) (assoc 8 en) en))
  (entmod en)
  (setq ind (+ ind 1))
 )
 (princ)
)
(princ “chlayer.lsp by Mirza Coralic. Type chlayer to change object’s layer.”)

Free CAD for dwg files

BabaCAD 1.2 is released out with dwg read support up to R2007 (R2007 not included). Dwg file format is widely used for sharing CAD drawings and CAD blocks. Special thanks to my friend Haris Hasanbegovic who helped me with dwg support. There are also many new usefull features in new version. Snap to nearest, intersection, perpendicular are now available (end-point osnap already was there). Text objects are now filled and curved with Arial font default. Ritght-to-left rectangular selection is precise for touch selection. Arc draw is now with three points input mode as default (center-start-end angle input is option in command window). Polyline includes bulges (arc segments) with smart input and editing feature. New modify commands: offset, trim and extend. Offset command very usefull for cnc offseting of 2D lightweight polylines with arc segments. Undo/redo up to 100 commands. More right-click menu commands. Mouse right-click can replace enter key in command window. Select as you click, esc or mouse rclick + Deselect all to deselect. File formats supported in BabaCAD are *.dwg, *.dxf for  open, and *.dxf for save. New release are coming soon with more new features, so check it out at http://www.babacad.com

Convert dxf to pdf

It’s often necessary to convert CAD files as dxf or dwg to pdf or some other image formats (jpg,bmp,gif,png..). Dxf to pdf quick and free solution is something that we have provided here. We developed dxf format plugin for IrfanView – world most popular image viewer. Latest IrfanView version 4.35 plugins pack includes BabaCAD4Image plugin to enable reading and viewing dxf files. BabaCAD4Image is free and has ability to convert dxf to image with unlimited resolution. This means you can go to IrfanView->Options->Plugins->Dxf Options and set whatever resolution/quality for converting dxf to image. Then, after you read and view dxf, you can save it to any image format (IrfanView supports over 100 image formats). Even more, you can use IrfanView batch processing feature to convert multiple cad drawings in command line at once. Download IrfanView 4.35 and plugins and try it, link is http://www.irfanview.com

Besplatan program za crtanje/projektovanje

Htio bih ovu temu pribliziti onima koji nisu najbolje upoznati sa pojmom computer aided design odnosno crtanja/projektovanja pomocu racunara ili skraceno CAD. CAD Softveri se najvise koriste za precizno crtanje odnosno projektovanje, medjutim postoji mnogo situacija kad cete trebati nacrtati nesto precizno, a da to ne bude neki tehnicki crtez. U takvim situacijama nezamislivo je kupovati neki skupi CAD softver kojima cijene idu i do nekoliko hiljada eura. Takodje, tu je i velik broj besplatnih CAD Softvera, i potrebno je odabrati jedan za ono sto vam treba. Ovdje cu dati preporuke kojima sam se ja vodio kad sam probao naci neki besplatan CAD softver za sebe:

- probajte naci besplatan CAD, a da to ‘besplatno’ ne bude na nacin: e za ovu funkciju trebate doplatiti i sl.
- trenutno se moze naci dosta tzv. autocad klonova, od kojih su 90% bazirani na intellicad platformi, koju je razvila grupa strucnjaka, medjutim pokazuje se s vremenom da je platforma losa, a kad je losa platforma lose je i sve ono sto se proba na njoj nadograditi i napraviti.
- broj korisnih komandi i funkcija
- slozenost koristenja programa
- brzina rada i zahtjevnost po pitanju hardvera (obavezno treba biti baziran na opengl ili directx grafici)
- velicina download-a (ako se u mjeri u Gb, sa brzinom interneta kod nas, mozete se dobro nacekati).

BabaCAD je jos uvijek u razvojnoj fazi i mnogo novih stvari bi trebalo ako Bog da biti uradjeno uskoro. Trenutno zavrsavam plot funkciju a tu ce biti i plot layout-i i sve ono sto treba za plotanje/stampanje kao model/paper modovi i sl.
Provjerite da li je postavljena nova verzija na http://www.babacad.com